This article provides insights to guide a Pipeline Pilot developer through the implementation of protocols designed for the LiveDesign gadget.
Collection overview
The components of the collection are available under Components\Discngine\LiveDesign Connector.
They allow you to manipulate LiveDesign Projects, folders, LiveReports, their columns and data. They are organized by entities and roles.
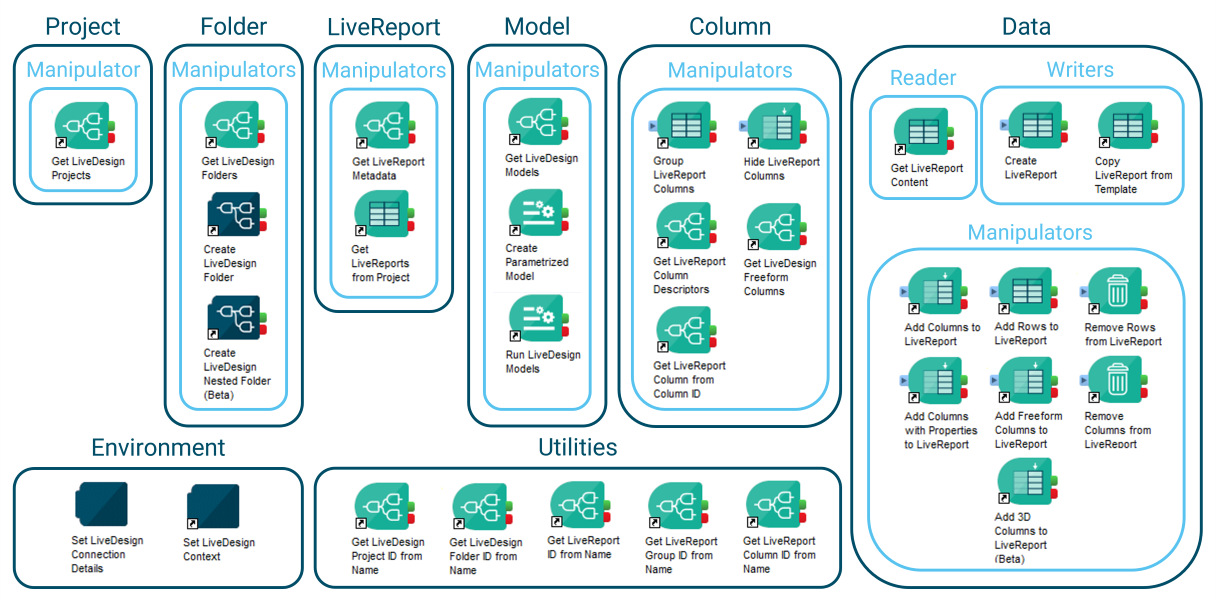
You can manipulate your data, either from an existing LiveReport or from another data source such as a database, and create new LiveReports, modify existing ones adding columns or rows, and organize your reports by creating folders and nested folders.
Example Protocols are available under Protocols\Discngine\LiveDesign Connector\Examples.
Create protocol in Pipeline Pilot
Layout of protocol
Pipeline Pilot protocols designed for the gadget are usually following similar layouts.
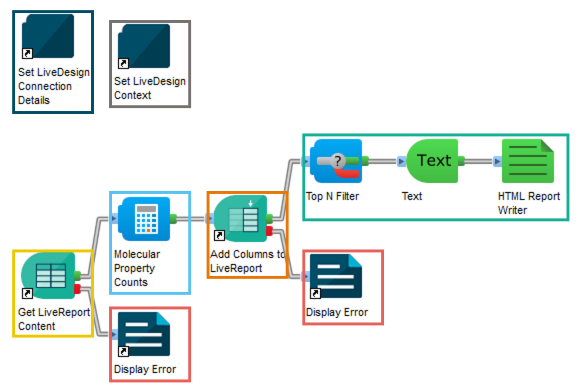
- Connection: connect to LiveDesign from Pipeline Pilot (required from Pipeline Pilot client only) using "Set LiveDesign Connection Details" component
- Context: extract (from the gadget) or set (from Pipeline Pilot) the LiveDesign context into global properties using the "Set LiveDesign Context" component
- Data sources: retrieve molecules from an external source with the usual Pipeline Pilot components, or retrieve them from an existing LiveReport using the “Get LiveReport Content” component
- Data manipulations: manipulate and create data with the usual Pipeline Pilot components
- Data writing: add the new data in an existing LiveReport or create a new LiveReport with molecules and data
- Reporting and error management: report results of the protocol to the user
Connection
If you want to be able to test your protocol in Pipeline Pilot, you need to add the "Set LiveDesign Connection Details" component at the begining of your protocol, and to fill it with your LiveDesign credentials.

Note that according to good practices, it is strongly recommended to remove all credentials from this component before publishing your protocol.
Context
You can use the "Set LiveDesign Context" component to set globals corresponding to the LiveDesign context. In the gadget, this component will extract the LiveDesign context. In the Pipeline Pilot client, it will set a context according to provided information.

This component extracts the active LiveReport when the protocol is triggered from the gadget, meaning the LiveReport in which the gadget is opened. The ID of this LiveReport is assigned to the global property named with the value of the "Active LiveReport Global Property Name" parameter (activeLiveReportID by default). You can then use this global in your protocol.
If the protocol is triggered from Pipeline Pilot, the global value is retrieved from the "Active LiveReport Default Value" parameter.
Data sources
You can retrieve molecules from an external source with the usual Pipeline Pilot components, or retrieve them from an existing LiveReport using the “Get LiveReport Content” component:
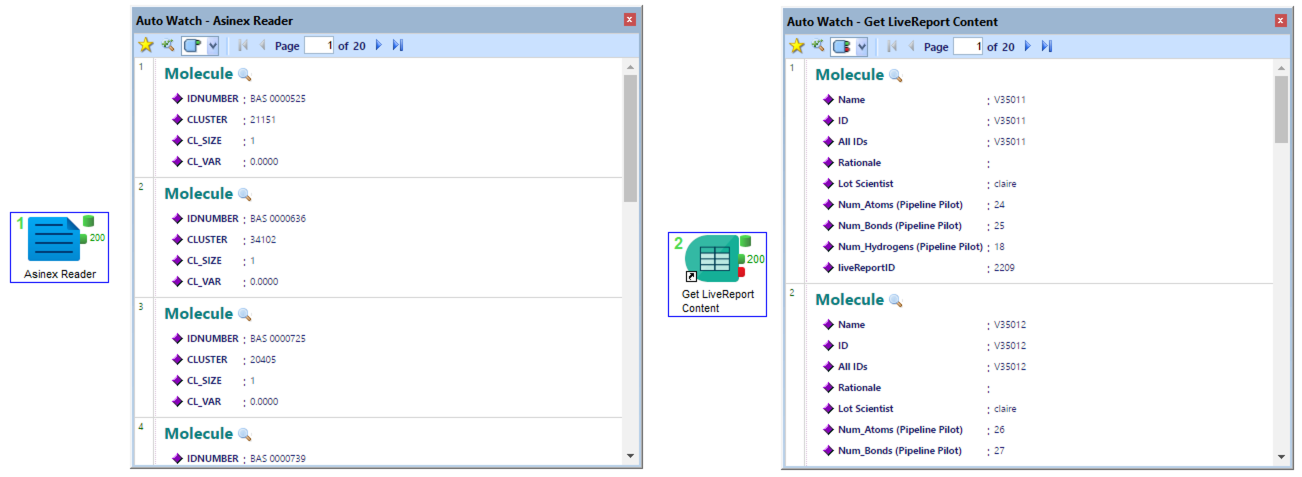
The “Get LiveReport Content” component needs the identifier of the LiveReport to retrieve. When you are on your LiveReport in LiveDesign, this identifier is the number after the endpoint livereports in the URL, in the following example the LiveReport identifier is 2209:https://[LiveDesign server]/livedesign/#/projects/302/livereports/2209.
In the case of data retrieved from a LiveReport, the records passed are Molecules with the columns of the LiveReport and its identifier as properties.
Data manipulations
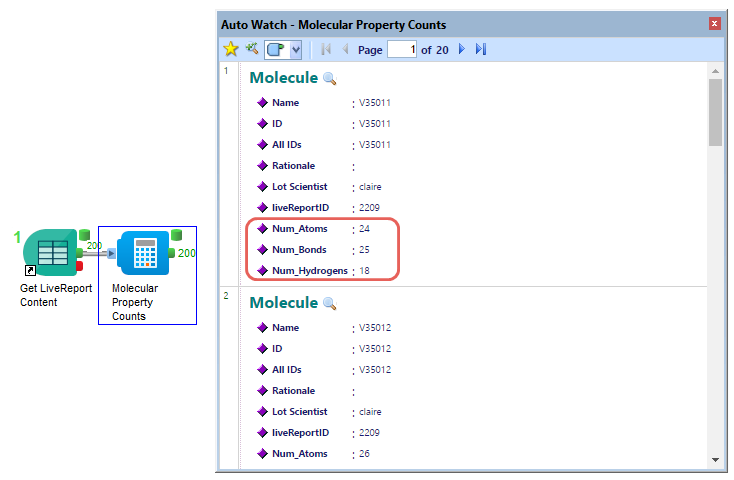
You can then manipulate this data with the usual Pipeline Pilot components, for example by calculating properties on the molecules:
Data writing to LiveReport
Finally, you can add these new properties as new columns in an existing LiveReport:

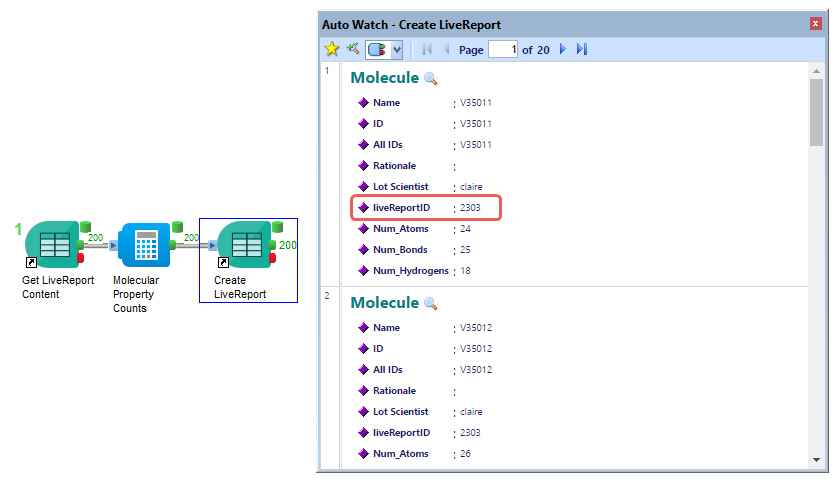
You can also create a new LiveReport with the molecules and all the properties. In that case, the identifier of the new LiveReport is exposed as a property of the molecules passed by the “Create LiveReport” component:
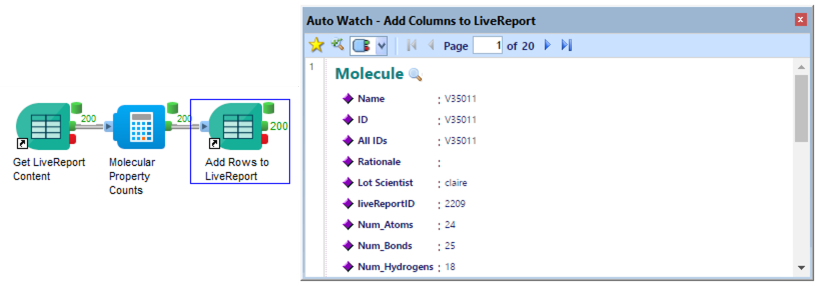
You can also add these molecules and all the properties as rows to an existing LiveReport:
Error management
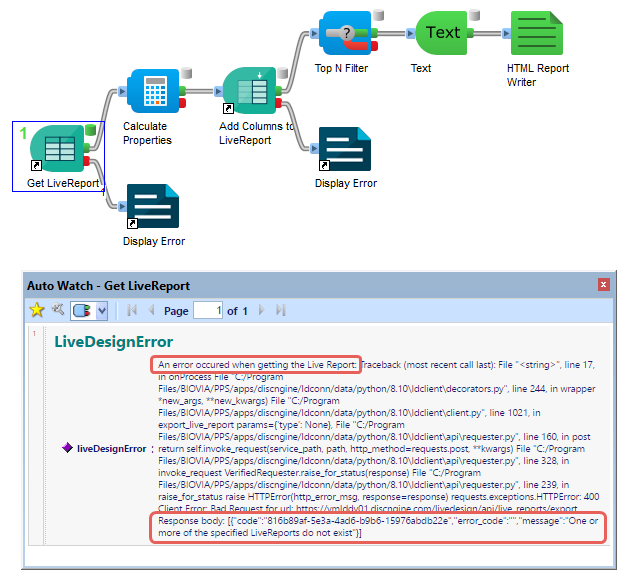
If an error occurs in a component of the collection, when calling the LiveDesign API, then the error returned by the API is directed to the Fail Port of the component, in a LiveDesignError record. In the following example, a non-existing LiveReport identifier has been provided to the "Get LiveReport Content" component:
Usage of IDs
The usage of identifiers is a key concept in the Connector collection. As a lot of LiveDesign elements can have same names, the identifiers are used to avoid mistakes when retrieveing or updating these elements.
For this reason, when an input is of type LiveDesign in the gadget, usually the identifier of the selected element is sent to Pipeline Pilot (see section below) and most of the components of the collection take identifiers as input parameters.
A lot of components take a LiveReport ID as input parameter. This ID can be easily retrived from LiveDesign as it corresponds to the last number in the URL of your LiveReport.
For other types of elements which do not have their identifiers accessible from the LiveDesign interface, utilities components are provided to retrieve ID from Name.
Test protocol
Before a protocol is registered in the gadget, it should be tested in Pipeline Pilot. For this you need to fill in your protocol's parameters, connect to LiveDesign and set the Livedesign context.
- Parameters: fill in the protocol's parameters like if you were in the gadget. If some IDs are required, you can use the utilities components in a dedicated protocol to get IDs from names.
- Connection: connect to LiveDesign from Pipeline Pilot using "Set LiveDesign Connection Details" component. Fill in the "LiveDesign Username" and "LiveDesign Password" parameters with your LiveDesign credentials.
- Context: set the LiveDesign context into global properties using the "Set LiveDesign Context" component. Set the "Active LiveReport Default Value" parameter to be able to consume the global property containing the active LiveReport ID.
Save location
The protocols designed for the gadget need to be saved under the Protocols folder as this folder is the only one visible from the gadget.
Register protocol in the gadget
Open the registration menu
Only Pipeline Pilot Gadget administrators can see the registration menu: click on "+" in the gadget menu to open the registration modal.
Select the protocol
- Browse the tree of Pipeline Pilot protocols and look for the protocol to be registered
- Click on the protocol name to load the parameters list
Define the inputs
The inputs of the protocol in the gadget are based on the parameters of the protocol.
For each input / parameter:
- Choose the type: based on the parameter type and name, the gadget will try to guess the most relevent input type (number, text, select, etc.)
- Adapt the description: based on the parameter help text
- Precise a default value: based on the parameter default value (not available for all input types)
- Add to the advanced parameters: the advanced parameters are hidden by default and can be displayed from the bottom of the protocol form
Once all inputs are configured, click on "Next" at the bottom of the page.
List of possible input types
Multi Checkboxes, available for array of defined values.
Multi Selection, available for array parameters.
Yes/No Toggle, available for Boolean fields.
Hidden field, available for all non-required parameters.
Multi Select, select with creation of options, available for array parameters without defined values.
Select, available for array parameters with defined values.
Long Text, available for string parameters with no defined values.
Text, available for string parameters with no defined values.
Number, available for float or integers parameters. Note that Pipeline Pilot enforces a value between -2,147,483,648 and 2,147,483,647.
Radio Select, available for string parameters with a list of allowed values.
Password, available for string parameters with no defined values.
Molecule, available for string parameters with no defined values. A Ketcher interface will be provided to draw a molecule. The output will be the CTAB of the molecule.
File(s) to upload, available for string or array of string parameters with no defined values. The user will be prompted to select one or more file(s) from his/her computer and those files will be uploaded in the Pipeline Pilot's job directory, in the /temp folder.
LiveReport, available for string and number parameters. The output will be the LiveReport ID.
LiveReport Column, available for integer parameters. Intended to work alongside LiveReport. You will have the option to specify if the parameter is linked to a LiveReport parameter. The output will be the column ID.
LiveReport Columns (Multiple), available for array of string and integer parameters. Intended to work alongside LiveReport. You will have the option to specify if the parameter is linked to a LiveReport parameter. The output will be the column IDs.
LiveReport Selected Rows, available for array of string and number parameters. The output will be the list of selected rows in the current LiveReport, identified by the ID column.
REST API Resource, available for strings, numbers or array of strings or number with no defined values. The specified endpoint must return a JSON response containing either an array of values (number or strings) or an array of objects with at least a value key and optionally a label key.
Group Field, available for group of parameters. There is no output.
Known limitations
Once a protocol is registered in the gadget, if you want to change the input parameters, the protocol must be deleted from the gadget and registered again.
Note that if the inside of the protocol is changed but not the input parameters, there is no need to register the protocol again.
Create the menu item
- Select an existing folder or create a new one
- Opionally change the menu item name
- Opionally activate the draft mode: the menu item is visible only by gadget administrators
- Set the protocol summary and description based from help texts
Test the protocol
- Select the newly registered protocol in the gadget menu
- Check that inputs are correctly configured
- Click on Submit to launch the protocol
- Check that the result of the protocol is expected (reporting in the gadget and effect on LiveReports)
