
## Package content
The Discngine LiveDesign Connector for Spotfire package contains:
- /spotfire_packages_14.6 and /spotfire_packages_14.0: folders containing the Spotfire package files for Spotfire versions 14.6 and 14.0 respectively (same content for each folder)
- Discngine.DataSource.LiveDesign.spk: the Analyst extensions for the LiveDesign DataSource
- Discngine.DataSource.LiveDesign.Web.spk: the Web Player extensions for the LiveDesign DataSource
- Discngine.Renderers.spk: the Discngine Renderers extensions
- Discngine.LiveDesign.Connector.sdn: the Spotfire distribution package that simplifies the deployment of all extensions
- /library: a folder containing the entry point document to be imported in the Spotfire library
- /web: a folder containing the gadget application to be deployed on the LiveDesign server
- PoweredBy.md: a file containing the list of third-party components used and their associated license for the Connector
- Renderers-PoweredBy.md: a file containing the list of third-party components used and their associated license for the Renderer
This package is available in the download center.
Prerequisites
- Licenses
- License keys are required to use the Connector, please contact us to get them.
- Spotfire
- Version 14.0+ or 14.6+ (LTS)
- Administrator group membership and remote access to the Spotfire server
- LiveDesign
- Version 2023+ or 2024+ or 2025+
- Administrator role and SSH access to the LiveDesign server
- Network opened from the Spotfire Web Player servers and users workstations to the LiveDesign server (see more details here)
If you have other Discngine Connectors installed on your Spotfire server, please ensure to have the versions compatible with the LiveDesign Connector for Spotfire. Note that the Spotfire Connector for Pipeline Pilot always needs to be upgraded first.
| LiveDesign Connector for Spotfire | Spotfire Connector for Pipeline Pilot | Spotfire Connector for Ideation |
|---|---|---|
| 4.1.X | 5.12+ or 6.1+ | 1.0.26+ |
| 4.3.X | 6.1.441+ | 1.0.135+ |
Spotfire
Deploy packages
In this step you will deploy the SDN file we provide in the package on your Spotfire server.
- Log in as an administrator on the Spotfire server web portal
- Go to the Deployments & Packages area
- Select the deployment area on which you want to deploy the Discngine Connector extensions
- Click on the "Add packages" button, then choose the .sdn file into the Discngine Connector package
- Click on "Validate area", then "Save area"
Update Web Player services
Update the corresponding Web Player services to install the Web Player tool.
See Spotfire official documentation for more information.
Edit Web Player configuration
To import data from LiveDesign to Spotfire, the Web Player worker service will have to write temporary files on the server's %TEMP% directory. The Web Player configuration must allow this.
Create configuration
In the following steps, the Spotfire server installation directory will be called %SPOTFIRE_HOME%.
-
Open a shell with administrator rights ("run as administrator") from the Spotfire server (not the node manager if they are on different servers)
-
Export the current config directory of your Web Player service area
%SPOTFIRE_HOME%\tomcat\spotfire-bin> config export-service-config --deployment-area="<Your Area>" --force --capability=WEB_PLAYERThis will create a config directory under the spotfire-bin directory.
-
Retrieve the path of the temporary folder of the Spotfire node manager service
- If the account used is Local Service, Local System, or Network services, or any service account, the default temporary folder is usually
%WINDOWS%\temp - If the account used is a generic account, please contact your system administrator to get the information
- If the account used is Local Service, Local System, or Network services, or any service account, the default temporary folder is usually
-
Edit the file
config\root\Spotfire.Dxp.Worker.Host.exe.config- Open this file with administrator rights
- Search and modify the following section (
AllowedFilePaths) to add a string element containing the path to the temporary folder (<string><Path To Temporary Folder></string>)
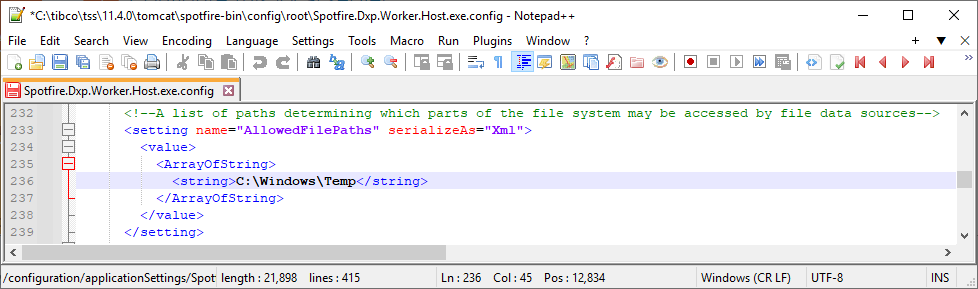
- Save the file
-
Import the config with a new name
%SPOTFIRE_HOME%\tomcat\spotfire-bin> config import-service-config --config-name="<New Configuration Name>"
Select configuration
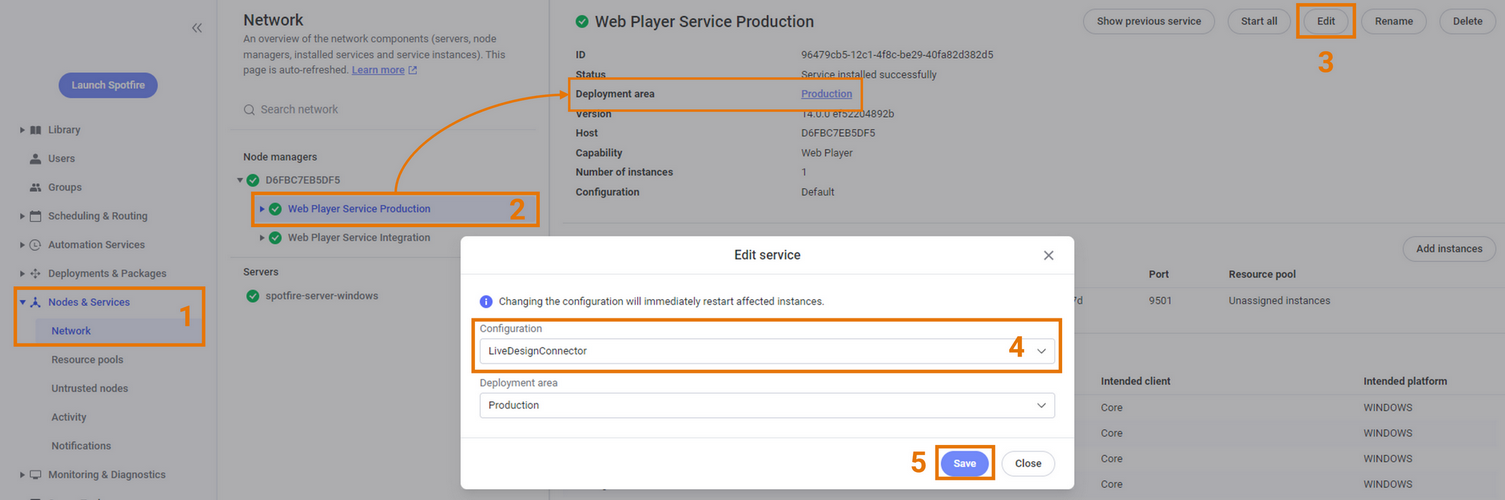
- Go to the Spotfire administration website in Nodes & Services > Network
- Select the Web Player service for the corresponding area
- Click on the "Edit" button
- Select the newly imported configuration
- Click on "Save", then Spotfire will restart the Web Player node.
Activate license features
For each relevant group defined on your Spotfire server, check that the following license features are enabled as described in the official documentation:
- Access to Extensions
- Spotfire Web Client
- Discngine LiveDesign Connector
- Discngine Renderers
Set preferences
From version 4.1+, the LiveDesign Connector for Spotfire also includes the Discngine Molecule Renderer that needs a new licence key to be configured in the preferences described here. To get the licence key, please contact us at support@discngine.com.
In Spotfire Analyst, go to Tools > Administration Manager, open the Preferences tab and fill the Discngine LiveDesign Connector preferences for the user groups to which you want to grant access to the LiveDesign Connector tool.
Example of filled preferences :
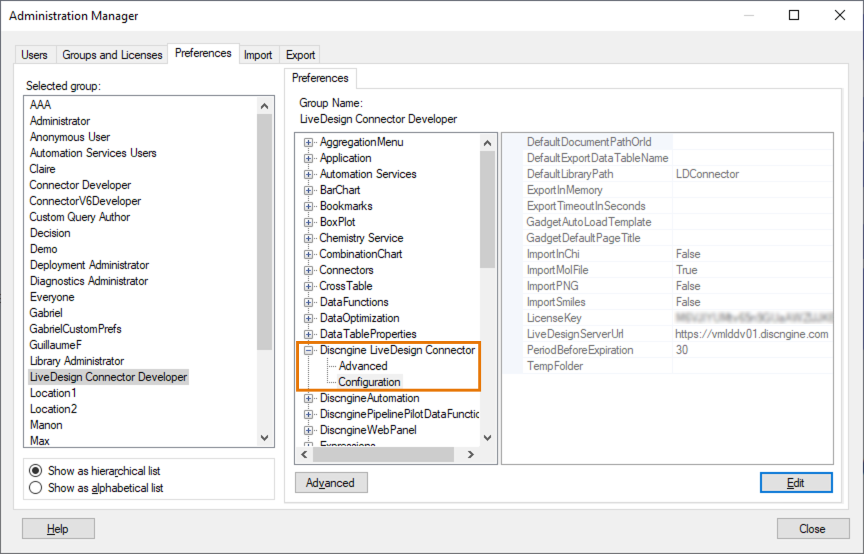
The LiveDesignServerUrl value is specific to each environment and must be the URL of the LiveDesign server that should be connected with Spotfire.
By default the DefaultLibraryPath value must be "LDConnector" (if you select "Library" in next section point 5), but if you change the location of this folder, it must be its new path.
SSO configuration
The GadgetUri value must be filled for SSO authentication to work correctly. It must be the uri of the gadget on the LiveDesign server, which is set as location in the gadget configuration. It must start with "/".
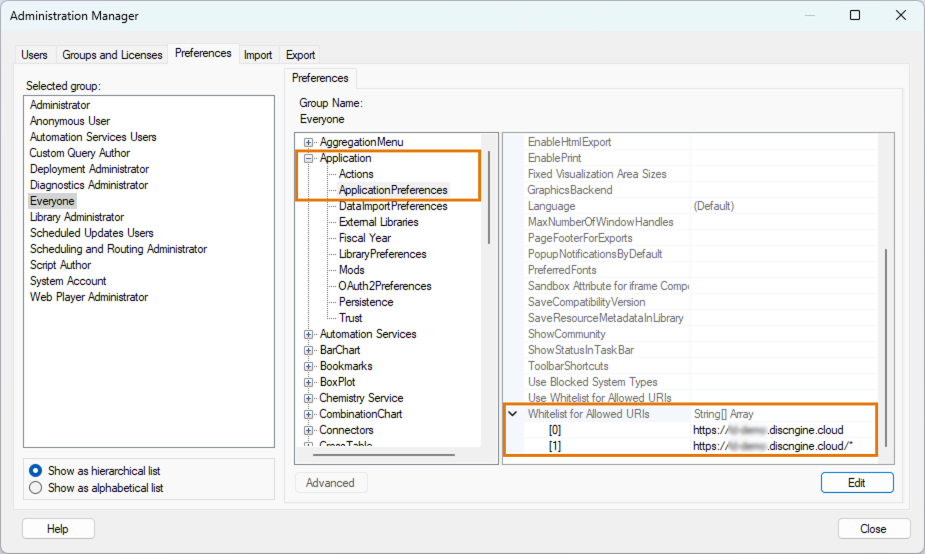
To allow LiveDesign SSO authentication, you must add the following URLs to the whitelist of the Application > ApplicationPreferences > Whitelist for Allowed URIs Spotfire preferences:
https://<livedesign server>https://<livedesign server>/*
Import library
Importing the provided LDConnector.part0.zip file in the library will create the folder "LDConnector" containing the file "empty.dxp".
To import this folder:
- Copy the
LDConnector.part0.zipfile on your Spotfire server shared directory, by default at the location[Spotfire root]\tss\[Spotfire version]\tomcat\application-data\library\. - Open the Spotfire Analyst client and log in using an administrator account.
- Open Tools > Library Administration.
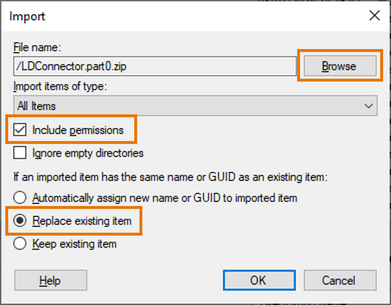
- Click on "Import" and "Browse" to select the file
LDConnector.part0.zip. Select "Include permissions" and "Replace existing item". - Choose your "Destination Folder". We recommend to select "Library". Then click on "OK".
For more details, refer to the Spotfire documentation
Define access rights to the imported library folder according to the following indications:
- All the LiveDesign Connector users need to have at least Browse + Access rights on the LDConnector folder
- Template designers must have Browse + Access + Modify rights on the LDConnector folder (if you wish to be more restrictive, you can apply these rights on specific projects folders)
Register API client
This step is highly recommended if you want to use the gadget with cross-site configuration between Spotfire and LiveDesign.
From Spotfire version 12, all web mashup applications can use an OAuth authentication flow. The official documentation is here.
The JavaScript mashup API uses the OAuth 2.0 protocol for authentication and authorization, with the Spotfire Server itself as authorization and authentication server. In this section, we will register a client to obtain the identifier needed in the Connector Gadget, which is a mashup application, to authenticate to Spotfire. This identifier must be communicated to a LiveDesign administrator in order to fill the "location" in the admin panel.
-
On the computer running Spotfire Server, open a command line as an administrator and change the directory to the location of the
config.batfile (config.shon Linux). The default location is<server installation dir>/tomcat/spotfire-bin. To execute commands on a local computer rather than the server computer, refer to the official documentation. -
To register a new client, use the command register-api-client and the following parameters:
.\config register-api-client --name="Discngine LiveDesign Connector Gadget" -S"api.js-api" -Soffline --client-profile=user_agent -Gauthorization_code -Grefresh_token -Ahttps://<livedesign server> -Rhttps://<livedesign server>/<gadget uri>/oauth_endpoint.htmlThe <gadget uri> placeholder used in "-R" parameter must be replaced by the gadget endpoint defined during gadget deployment. Most of the time it will be
livedesign/gadgets/connector/spotfire, check with a LiveDesign administrator. The "--name" parameter can have a different value than the one given as an example. The other parameters must not be changed.If needed you can list the registered OAuth2 clients using the command list-oauth2-clients. The command show-oauth2-client will allow you to see the full configuration of a client.
-
After successful completion of the command register-api-client, the Client ID will be shown. It must be communicated to the LiveDesign administrator in order to fill the "location" in the admin panel.
Edit server configuration
From Spotfire version 12.5, this step is required if content security policy is enabled on the Spotfire server. See Spotfire official documentation for more information.
In the following steps, the Spotfire server installation directory will be called %SPOTFIRE_HOME%.
-
Open a shell with administrator rights ("run as administrator") from the Spotfire server (not the node manager if they are on different servers)
-
Export the active server configuration
%SPOTFIRE_HOME%\tomcat\spotfire-bin> config export-config --forceThis will create a
configuration.xmlfile under the spotfire-bin directory. -
Replace the value of the content security policy directive property with your previous directive plus
https://<livedesign server>andhttps://<livedesign server>:*%SPOTFIRE_HOME%\tomcat\spotfire-bin> config set-config-prop -n security.content-security-policy.directive -v <value>Important: if you do not know the actual content security policy directive, open the
configuration.xmlfile and search for thecontent-security-policysection (name can be different according to Spotfire versions) to make sure to keep the previous values in the directive. -
Import the configuration
%SPOTFIRE_HOME%\tomcat\spotfire-bin> config import-config --comment="LiveDesign server added to CSP" -
Restart the Spotfire server as described in Spotfire official documentation
LiveDesign
The LiveDesign part of the installation involves deploying and configuring the Spotfire Connector Gadget. As many LiveDesign gadgets, it is a web application and needs to be hosted on the LiveDesign server. The deployment procedure is different if the LiveDesign server is on-premise (legacy installation process) or on cloud (see below).
Deploy on server
For the following steps, we assume that your LiveDesign instance is hosted on cloud and deployed by Schrödinger. You will probably need to contact your Schrödinger architect to perform them.
-
Download the helm chart here
- This is an example of a helm chart file that you can use or take inspiration from to deploy the gadget to suit your needs
- Note that this zip package can be used for the LiveDesign Connector for Pipeline Pilot or for the LiveDesign Connector for Spotfire
-
Unzip the folder and open the README.md file located at the root
- This file explains the procedure for the two gadgets
-
Follow the instructions under the LiveDesign Spotfire gadget section
Configure in admin panel
The last step is the configuration of the gadget in the LiveDesign administration tool.
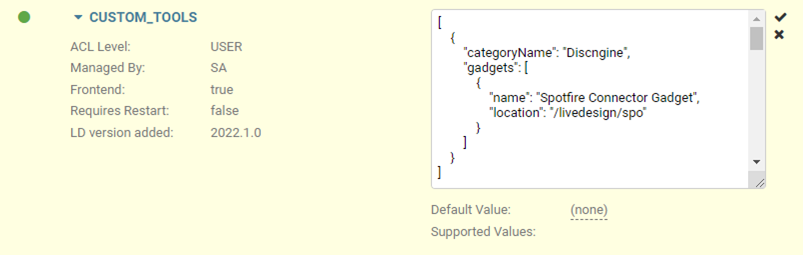
Go to LiveDesign Admin Panel > Properties > CUSTOM_TOOLS and declare the gadget.
If the Register API client step has been done:
[
  // ... other gadgets
  {
    "categoryName": "Discngine",
    "gadgets": [
        {
            "name": "Spotfire Connector",
            "location": "<gadget uri>index.html?spotfireConnectorJsApiClientId=<client id>&spotfireConnectorJsApiRedirectUrl=https://<livedesign server><gadget uri>oauth_endpoint.html"
        }
    ]
  }
]
If not:
[
  // ... other gadgets
  {
    "categoryName": "Discngine",
    "gadgets": [
        {
            "name": "Spotfire Connector",
            "location": "<gadget uri>"
        }
    ]
  }
]
Placeholders:
<gadget uri>:/livedesign/gadgets/connector/spotfire/for cloud deployment if the provided helm chart has been followed/livedesign/spofor on-premise deployment (legacy, not recommended)
<livedesign server>: the uri of your LiveDesign server<client id>: the registered API client ID, ask to the Spotfire administrator
Communicate to the Spotfire team the gadget uri. They will need it to fill the GadgetUri preference and to register the API client.
Validation
Once the installation is completed on both Spotfire and LiveDesign side, validate that everything is working as expected. This check can be done either directly with a user, or by a Spotfire or LiveDesign administrator. In this latest case, the administrator needs to be sure to respect some prerequisites:
- Have a LiveDesign account
- Have access to at least one project and one LiveReport in LiveDesign
- Have a Spotfire account
- Have access to the imported Spotfire library folder
- Be in the good Spotfire group to have the Connector license features and preferences set
To validate the installation, follow this tutorial.
Note: if the tester does not have a Spotfire Business Author or Analyst license, it is possible to skip the Add visualizations section.