
The following installation and upgrade procedures to deploy the Spotfire Connector Gadget application are based on a legacy LiveDesign on-premise installation using nginx as application server. For the following steps, we assume you have SSH access to your LiveDesign server. Note that you might need sudo rights on the LiveDesign server.
Installation
- Copy the content of the
webfolder from the LiveDesign Connector package to the server, under seurat/custom_gagdets directory:
scp -r /path/to/web <user>@<ld_server_url>:/home/seurat/custom_gadgets/ldconnector
- Edit the config file
Use your favourite editor to open the file /home/seurat/custom_gadgets/ldconnector/config/config.json
{
  "authentication": {
    "liveDesignSessionUri": "/livedesign/session"
  },
  "visualizer": {
    "url": "<spotfire-url-host-with-protocol>",
    "entryPointDocumentIdOrPath": "df7b5c3b-935c-4dde-b102-54f44b3b6a6b"
  },
  "data": {
    "liveDesignServerUrl": "<livedesign-url-host-with-protocol>"
  }
}
- Set your Spotfire server url in the > visualizer > url property, e.g. "https://spotfire.mycompany.com"
- Set the id of the entry point document in the > visualizer > entryPointDocumentIdOrPath property (see below for details). The entry point document is the default document that will be used to check the connection to Spotfire. We strongly suggest to use the empty document provided in the LDConnector.part0.zip file.
- Set the LiveDesign url in the > data > liveDesignServerUrl property, e.g. 'https://livedesign.mycompany.com"
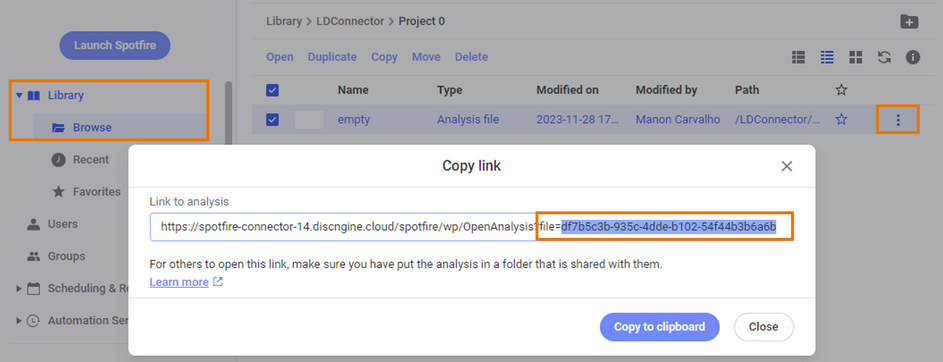
To get the id of the default entry point document:
- Go to the Spotfire administration website in Library > Browse
- Open the
/LDConnector/Project 0/Defaultfolder and click on Copy link for theemptydocument - Take the id of the document from the link and use it as
entryPointDocumentIdOrPath
- Check that the ownership and access rights are correct:
sudo chown seurat:seurat -R /home/seurat/custom_gadgets/ldconnector/
# if required:
sudo chmod 755 -R /home/seurat/custom_gadgets/ldconnector/
- Create/edit the nginx configuration to expose two locations
Go to the nginx config folder:
cd /etc/nginx/endpoints.d
Create a new config file for the Discngine configuration and open it with your favourite editor:
touch discngine.conf
vi discngine.conf
Then paste the following piece of code:
location = /livedesign/session {
    default_type text/plain;

    if ( $http_cookie ~ "JSESSIONID=(?<token>[^;]*)" ) {
        return 200 $1;
    }
    return 401;
}

location /livedesign/spo {
    alias /home/seurat/custom_gadgets/ldconnector/;
    index index.html;
}
Save your file and restart nginx:
sudo systemctl restart nginx
Upgrade
The procedure is similar to the installation procedure.
-
SSH to your LiveDesign server.
-
Backup the previously installed gadget directory.
-
Copy the content of the
webfolder from the LiveDesign Connector package to the server, underseurat/custom_gagdetsdirectory:
scp -r /path/to/web <user>@<ld_server_url>:/home/seurat/custom_gadgets/spotfire
-
Replace the file in
/home/seurat/custom_gadgets/spotfire/config/config.jsonby the config.json file from the backed up folder. -
Check that the ownership and access rights are correct:
sudo chown seurat:seurat -R /home/seurat/custom_gadgets/spotfire/
# if required:
sudo chmod 755 -R /home/seurat/custom_gadgets/spotfire/