The Automation Services can be used in two different ways: using the Client Job Sender tool, or using the REST API. The use of these two solutions is described below.
The Client Job Sender is an executable compatible with Windows only, which will be hosted on the Pipeline Pilot server. This solution requires the deployment of the Client Job Sender tool, its configuration and a little configuration in the Connector.
Using the REST API, available from the TIBCO Spotfire® 7.13, no deployment is required, just a little configuration on the Spotfire server and in the Connector.
We strongly recommend using the REST API because it is more secure and easier to set up. The Client Job Sender tool option will be deprecated soon.
The Client Job Sender tool
The Spotfire Client Job Sender must be installed on the Pipeline Pilot server. Please note that this tool is compatible with Windows servers only.
The Job Sender tool and its configuration file are downloaded as part of the Automation Services bundle. To install and configure them, follow these steps:
-
Copy the two files Spotfire.Dxp.Automation.ClientJobSender.exe and Spotfire.Dxp.Automation.ClientJobSender.exe.Config into the same directory on the Pipeline Pilot server ([ClientJobSender directory]).
-
Fill the configuration file Spotfire.Dxp.Automation.ClientJobSender.exe.Config with your settings. Set at least the username and its password. This user must be a member of the Spotfire group "Automation Services Users". For more details about this configuration file, see the official documentation.
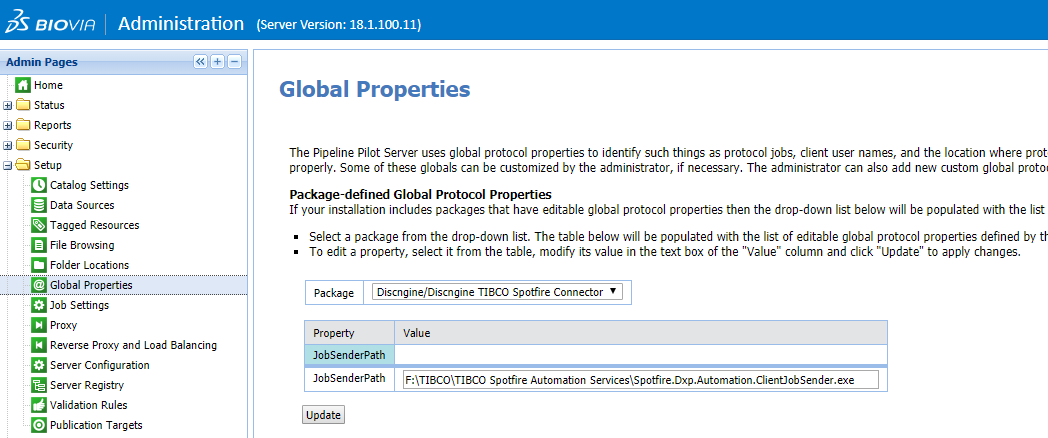
Now, a global property must be set for the "Run Client Job Sender" Pipeline Pilot component:
- Open the Pipeline Pilot server administration page.
- Navigate to Setup > Global Properties in the left panel.
- Choose "Discngine/Discngine Spotfire Connector" in the package list.
- Fill the Client Job Sender executable path in the property "JobSenderPath".

The Automation Services REST API
From TIBCO Spotfire® version 7.13 a REST API is available to trigger Automation Services jobs from an external application. The official documentation is here.
This API uses the OAuth 2.0 protocol for authentication and authorization, with the Spotfire Server itself as Authorization Server. In this section, we will register a client to obtain the credentials needed in the Connector components to use the REST API. There will be two steps: the first one must be done by a Spotfire administrator, the other by a Pipeline Pilot administrator.
On the Spotfire® side
-
On the computer running Spotfire Server, open a command line as an administrator and change the directory to the location of the
config.batfile (config.shon Linux). The default location is<server installation dir>/tomcat/spotfire-bin. To execute commands on a local computer rather than the server computer, refer to the official documentation. -
Export the active server configuration (the
configuration.xmlfile) by using the export-config command. Example:> .\config export-config -
To register a new client, use the command register-api-client and the following parameters:
> .\config register-api-client --name="AutomationServicesAPIClient" -S"api.rest.automation-services-job.execute" --client-profile=other -Gclient_credentialsThe "--name" parameter may have a different value than the one given as an example, but the other parameters must not be changed.
If needed you can list the registered OAuth2 clients using the command list-oauth2-clients. The command show-oauth2-client will allow you to see the full configuration of a client. Examples:
> .\config list-oauth2-clients # Basic information on registered clients, including the <Client ID> > .\config show-oauth2-client -i <Client ID> -
After successful completion of the command register-api-client, the Client ID and the Client Secret will be shown. They must be communicated to the Pipeline Pilot administrator.
-
After you have finished running commands, upload the modified configuration back to the Spotfire database by using the import-config command. The configuration that you import becomes the active configuration for that server or cluster. Example:
> .\config import-config --comment="what was changed" -
Restart Spotfire Server, refer to the official documentation if needed.
On the Pipeline Pilot side
To complete the setup of the Connector to use the Automation Services REST API, you now just have to fill the Client ID and the Client Secret previously generated in package-defined global properties.
- Open the Pipeline Pilot server administration page.
- Navigate to Setup > Global Properties in the left panel.
- Choose "Discngine/Discngine TIBCO Spotfire Connector" into the package list.
- Fill the Client ID in the property "AutomationServicesClientID".
- Fill the Client Secret in the property "AutomationServicesClientSecret".
