

Every peptide SAR Slide is built on an alignment — the position-by-position frame that lets Ideation compare peptides of different lengths and compositions. This guide covers the three ways to get one, how to read the warnings an imported file can raise, how to repair those warnings in the alignment editor, and how to correct which branch a side chain belongs to.
You need edit access on the dataset to add an alignment. With view-only access the New Alignment button is disabled and reads "You need edit access on this dataset to add an alignment."
Where alignments live
An alignment belongs to the dataset, not to a report. One dataset can hold as many alignments as you like, and each SAR Slide picks one of them — so two slides in the same report can use different alignments over the same peptides.
You manage them from the Alignment section, which appears in two places:
- the Create New SAR Report dialog, when you are creating a report;
- the peptide viewer's data-configuration panel, in the collapsible Alignment accordion, once a report is open.
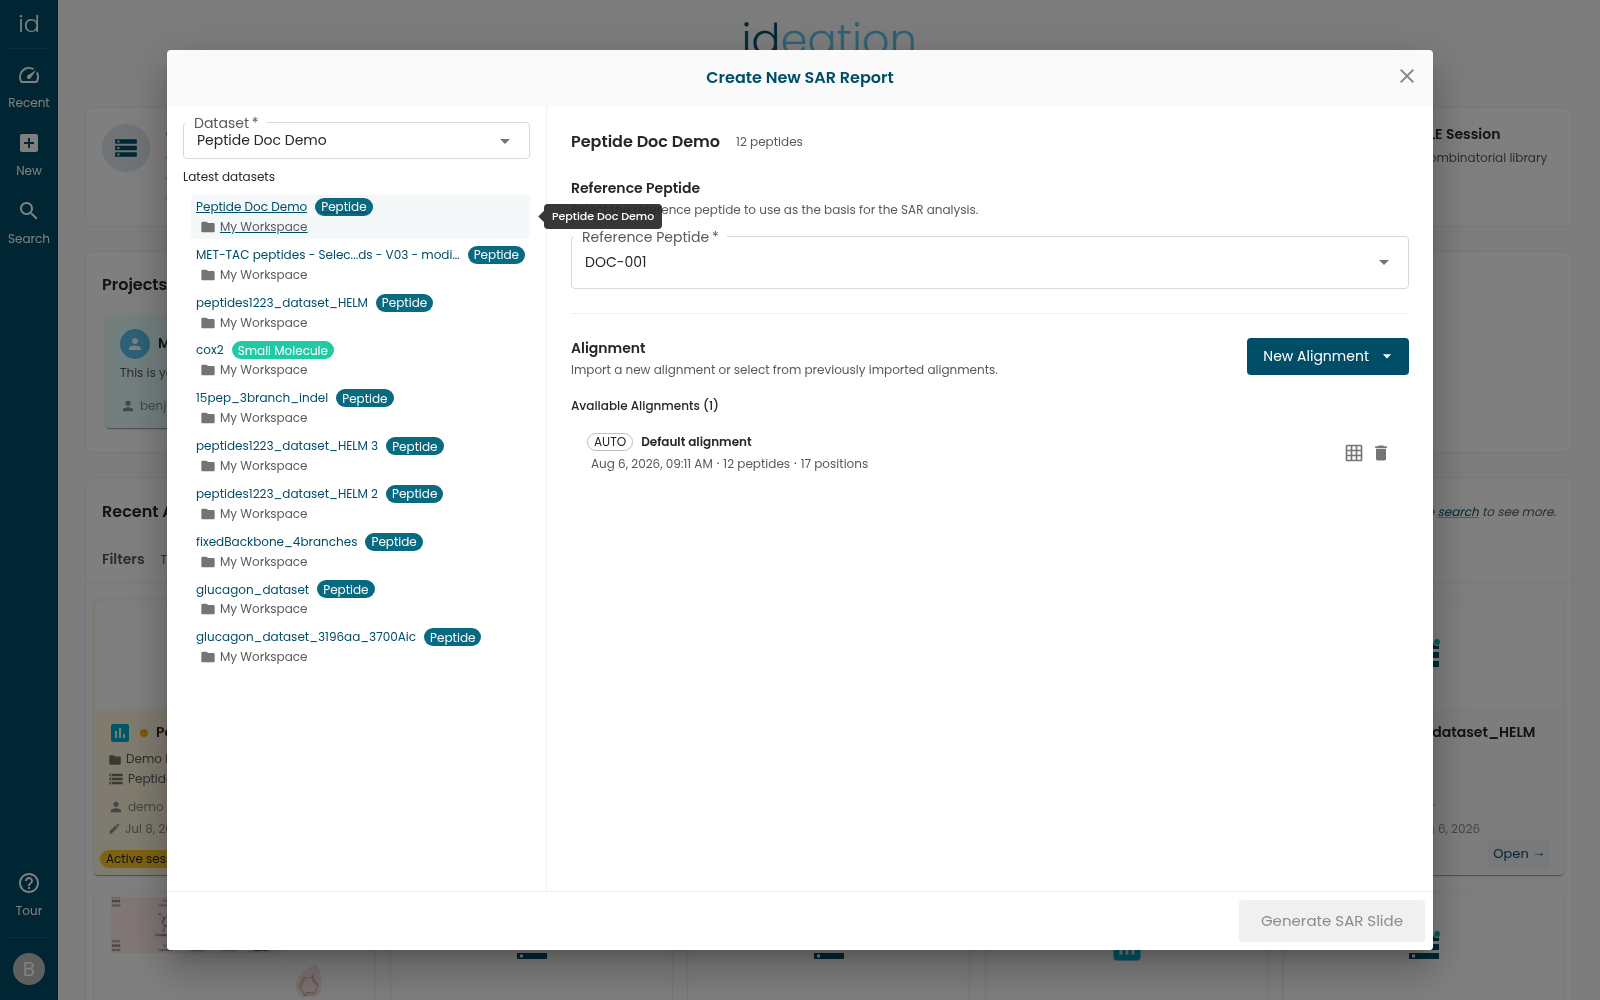
Both show the same Available Alignments list. Each row carries a source badge — AUTO for an alignment Ideation computed, IMPORT for one you uploaded — the alignment's name, and a summary line: date · N peptides · N positions (· x/y branches aligned, for datasets with branches). Newest appears first. The icons on the right open the alignment editor (Edit alignment) or remove it (Delete alignment).
Option 1: Use the alignment created at import
Every peptide dataset arrives with an alignment already computed. During import, Ideation runs a Generating Alignment step and stores the result as an alignment named Default alignment with the AUTO badge. You can generate a SAR Slide immediately, without providing any file.
The computation is best-effort: if it cannot run, the import still succeeds and simply produces no default alignment. That happens when no peptide in the dataset carries a HELM sequence, or when the dataset holds more than 5,000 peptides. In that case the list reads "No alignments available. Import an alignment file to get started." and you use one of the options below.
For the method behind it — how the reference is chosen, how substitutions are scored, how gap costs are decided — see Understanding Peptide Alignment.
Option 2: Generate an alignment on demand
Click New Alignment and choose Generate automatically ("Align the dataset's own sequences").
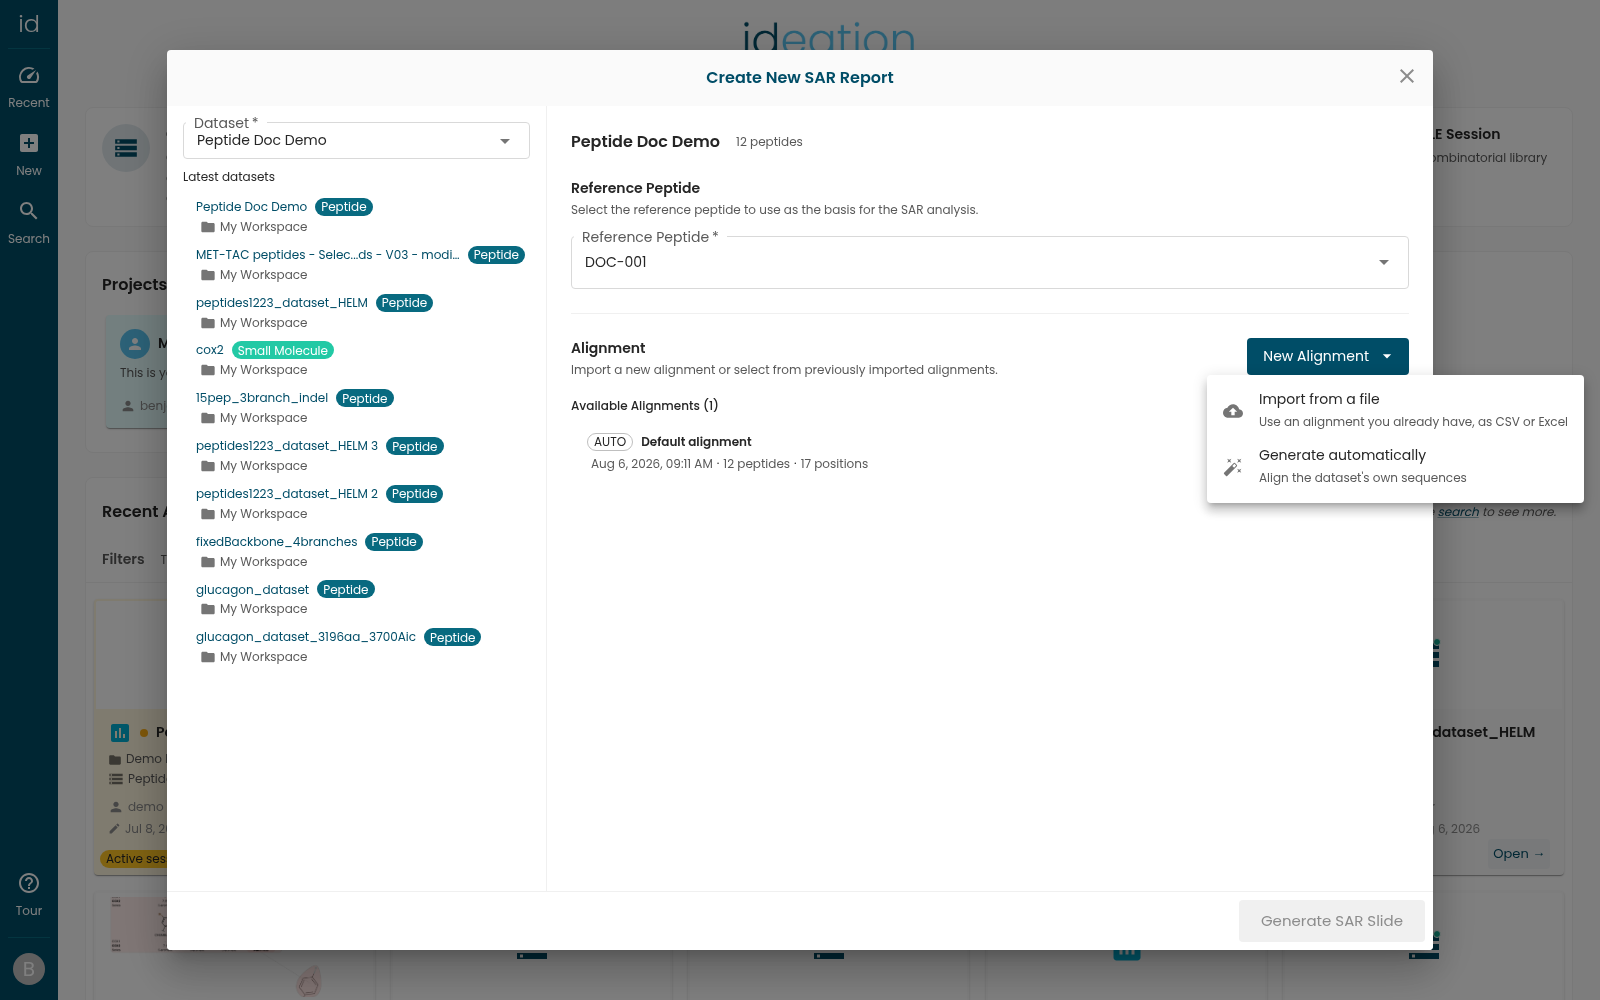
The button reads Generating… while it runs, then an Alignment generated successfully message confirms it and the new alignment is selected for you.
Generating adds an alignment — it never overwrites or replaces an existing one, and imported alignments are left untouched. Because generated alignments are all named Default alignment, repeated generation produces same-named rows; remove the ones you don't want with the row's delete icon.
Use this when the dataset was imported before automatic alignment existed, when automatic alignment was skipped at import, or when you want a computed frame to compare against a curated one.
Option 3: Import an alignment from a file
Click New Alignment and choose Import from a file ("Use an alignment you already have, as CSV or Excel").
File format
The layout is the same for CSV and for each Excel sheet:
- Column 1 holds the structure's primary identifier — the ID Ideation matched your peptides on at import.
- Every following column is one alignment position. The header labels the position; they must all be non-empty and unique.
- Each cell holds one monomer symbol. A hyphen (
-) is a gap; an empty cell is read as a gap too. - A file needs at least 2 columns (the ID plus one position).
ID,1,2,3,4,5
PEP-001,A,G,V,-,L
PEP-002,-,G,V,A,L
Use the Download template: CSV | Excel links in the dialog to start from a valid file. The Excel template ships with two sheets, backbone and branch_1, to show the multi-sheet layout.
| Format | What it covers |
|---|---|
CSV (.csv) |
Backbone only. |
Excel (.xlsx) |
Backbone and branches — one sheet per chain. |
The alignment file must be an uncompressed .csv or an .xlsx. A gzipped .csv.gz is rejected with "Unsupported file format: .gz. Use .csv or .xlsx."
Step 1: Choose the file and name it
Pick the file and fill in Alignment Name — it is pre-filled from the filename, and it is the name you will see in the Available Alignments list, so make it meaningful.
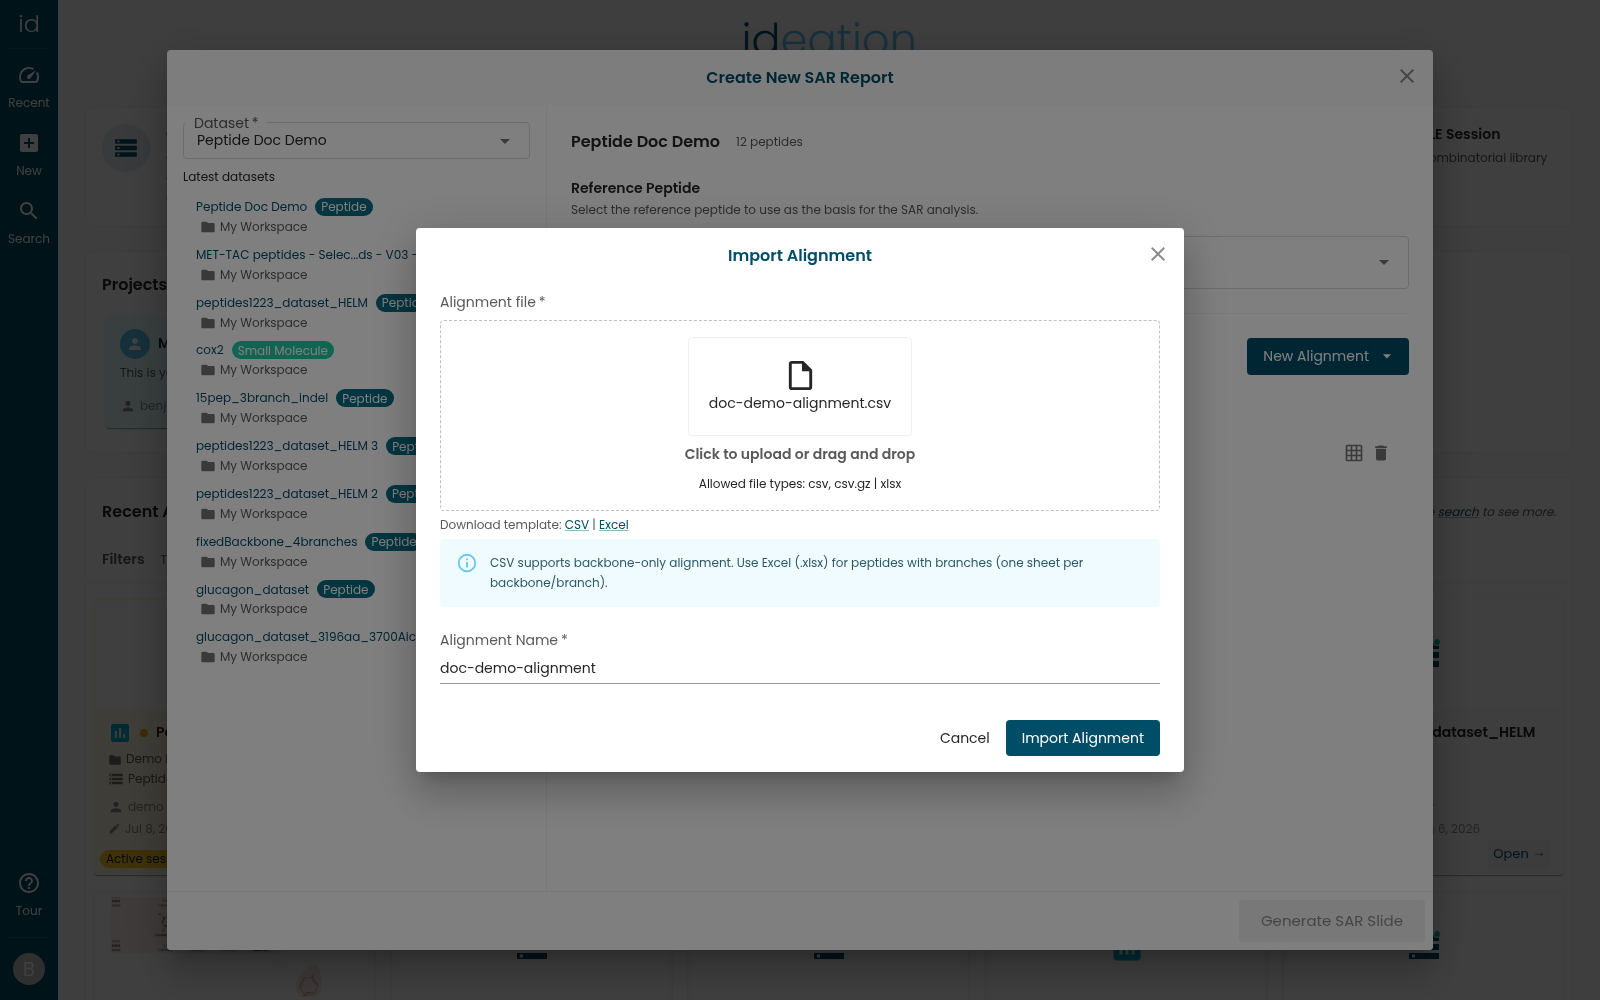
A CSV, or an Excel file with a single readable sheet, imports from here in one click. A multi-sheet Excel workbook walks two more steps first.
Step 2 (Excel): Choose the backbone sheet
Ideation cannot guess which sheet is the backbone, so it asks: "Which sheet holds the backbone alignment?" Each candidate is listed with its shape, so you can recognise it by size.
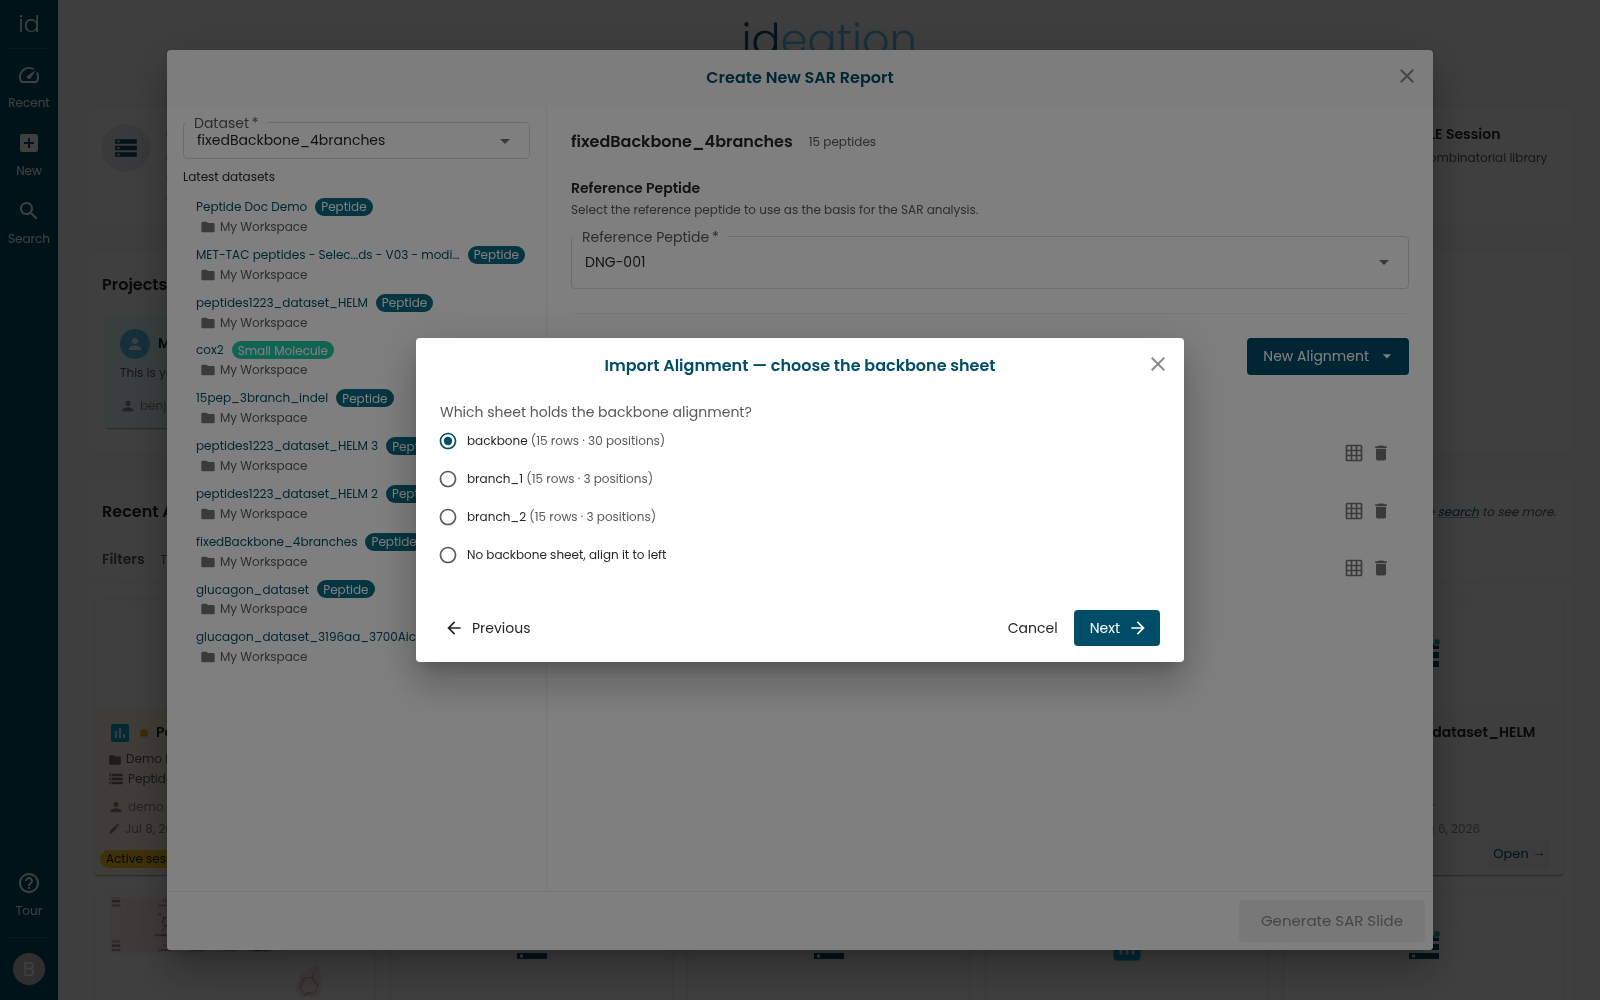
Choosing No backbone sheet, align it to left tells Ideation to rebuild the backbone frame from the dataset's own HELM sequences and treat every sheet in the file as a branch sheet.
Sheets that could not be read at all are listed under Ignored sheets: with the reason.
Step 3 (Excel): Map the branch sheets
Ideation detects the dataset's real branches on the chosen backbone frame and asks you to say which sheet aligns each one. Every branch gets a dropdown listing the remaining sheets plus Align at left.
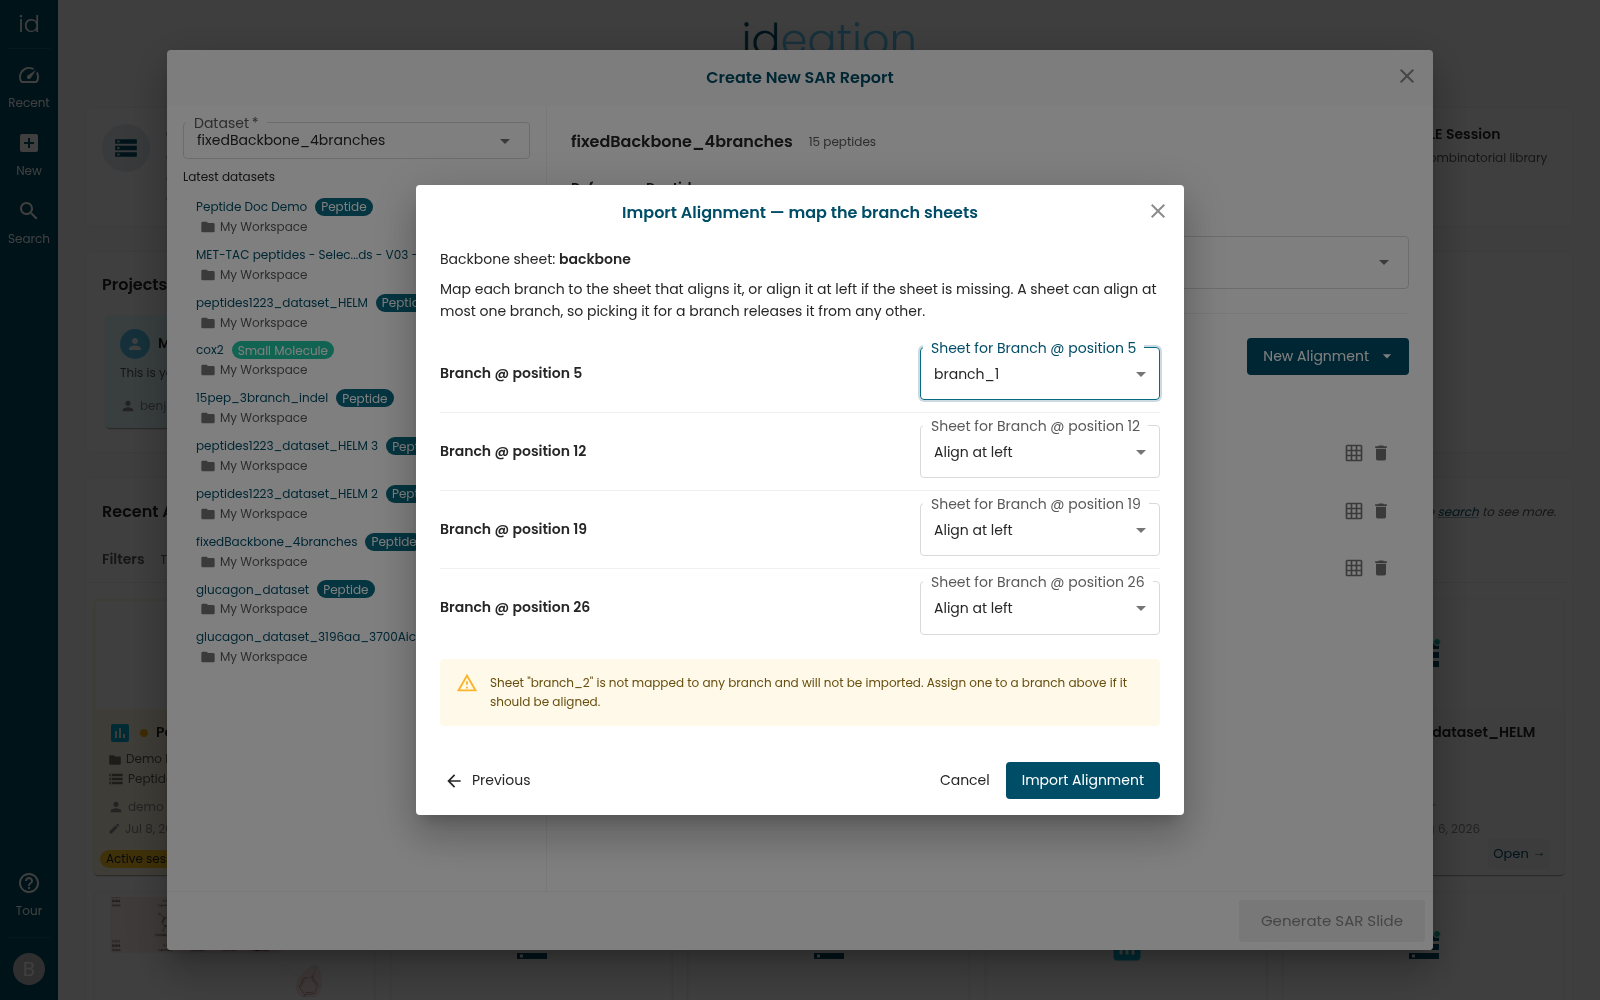
A sheet can align at most one branch, so assigning it to a branch releases it from any other. Sheets you leave unassigned are called out explicitly — "Sheet "branch_2" is not mapped to any branch and will not be imported." — rather than being dropped silently.
Click Import Alignment to finish.
Review the import warnings
Importing is non-blocking. A file that does not perfectly agree with the dataset is still imported: the peptides that match are stored, and every discrepancy is recorded as a warning on the alignment. Only genuinely unusable input fails — a file that cannot be parsed, or one where no identifier matches any structure in the dataset.
So the import ends one of two ways:
- Alignment imported successfully — nothing to review.
- Alignment imported with warnings — review them in the alignment list — the alignment is there, and its row now carries an amber warning icon.
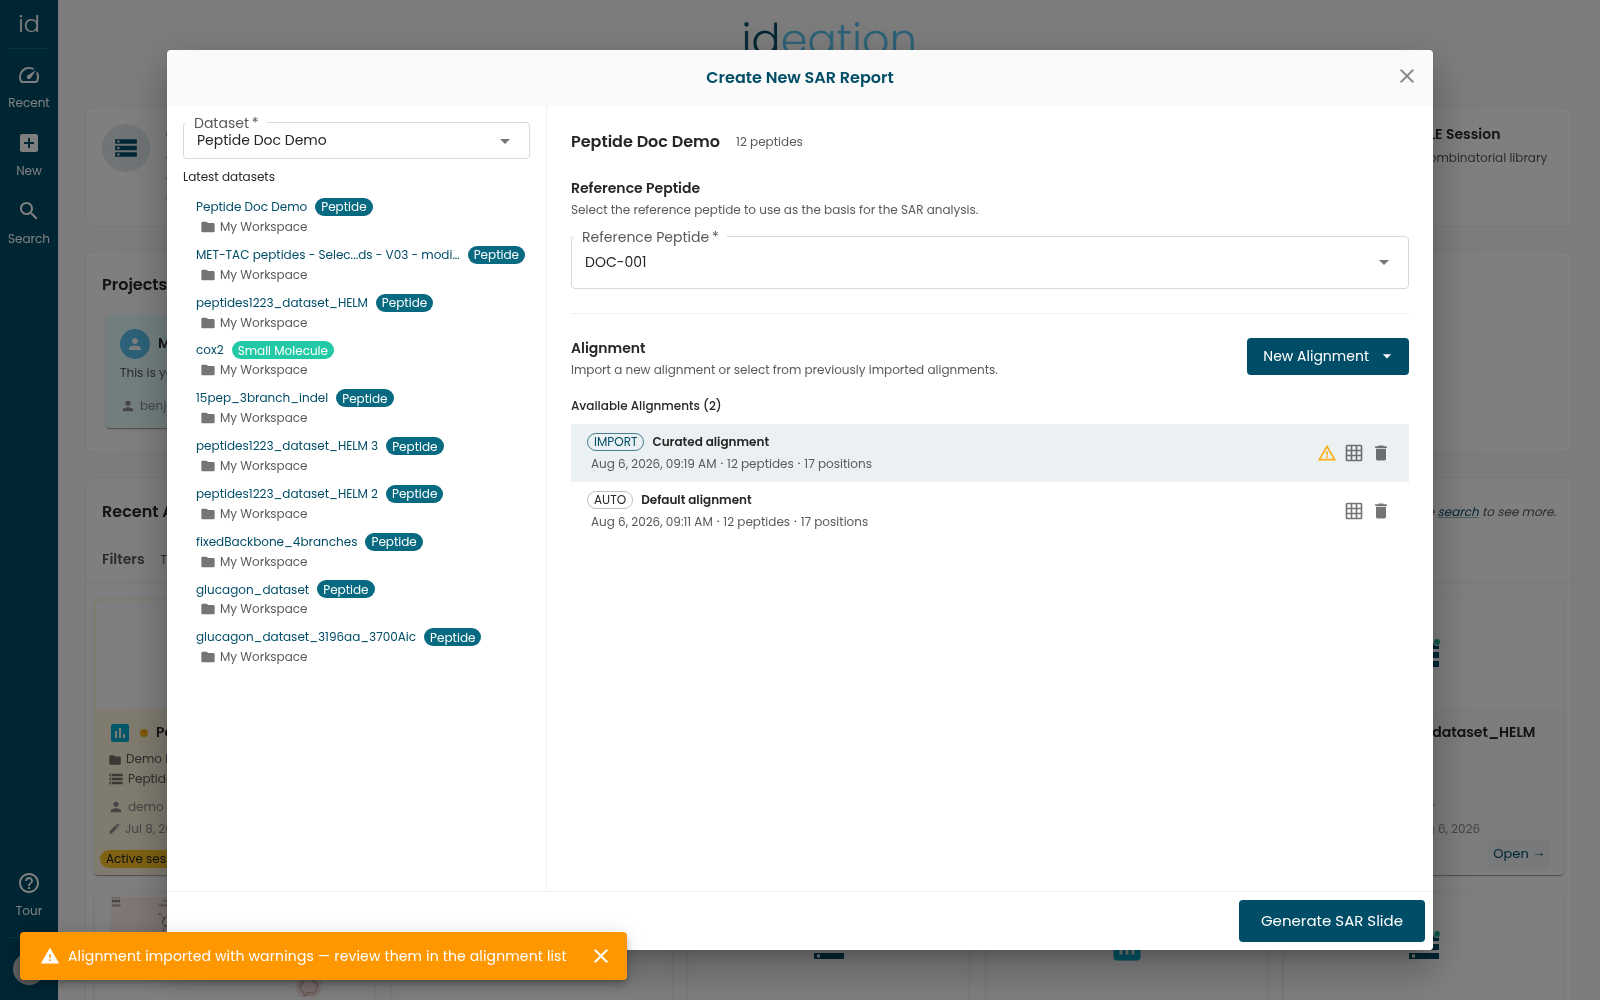
Click the amber icon (View import warnings) on the row to reopen the Import Warnings dialog at any time — the warnings are stored with the alignment, not just shown once.
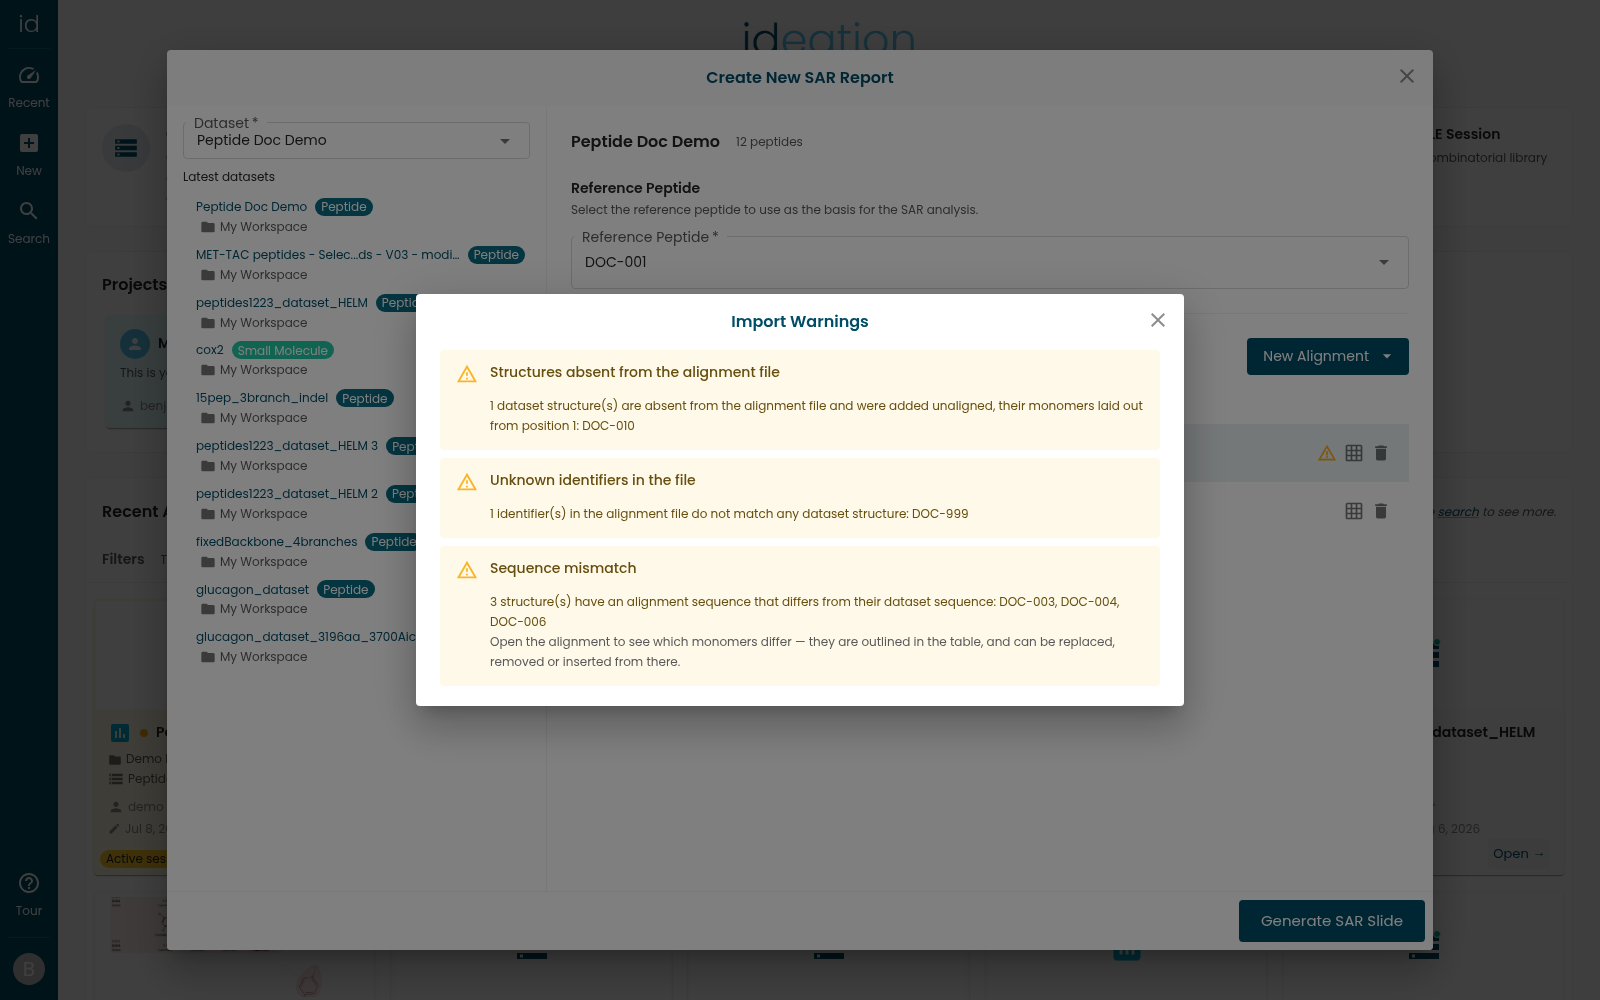
| Warning | What it means | What to do |
|---|---|---|
| Structures absent from the alignment file | Dataset peptides your file didn't mention. They were added unaligned, with their monomers laid out from position 1. | Add them to the file and re-import, or align them by hand in the editor. |
| Unknown identifiers in the file | Rows whose ID matches no structure in the dataset. They were ignored. | Usually a typo or a row from another dataset — check the IDs. |
| Sequence mismatch | The monomers a peptide has in the alignment differ from the monomers it actually has in the dataset. | Fix it in the alignment editor — see below. |
| Excluded: no monomer sequence | Dataset peptides with no usable HELM sequence. They were left out of the alignment entirely. | Nothing to do here — fix the peptide's HELM at the source if it should be analyzed. |
| Ignored sheet | An Excel sheet was skipped, with the reason; or a sheet was mapped to no branch. | Re-import with the sheet mapped, if it should have been. |
| Backbone not common | Some peptides don't share the dataset's common backbone, so their branch columns may be misaligned. | Review those peptides; consider importing an explicit backbone sheet. |
Only the first 10 identifiers are listed in each message, followed by "(and N more)".
Fix a sequence mismatch in the alignment editor
A sequence mismatch is the one warning you repair directly in Ideation, and the alignment editor is built for it. Open it with the grid icon (Edit alignment) on the alignment's row.
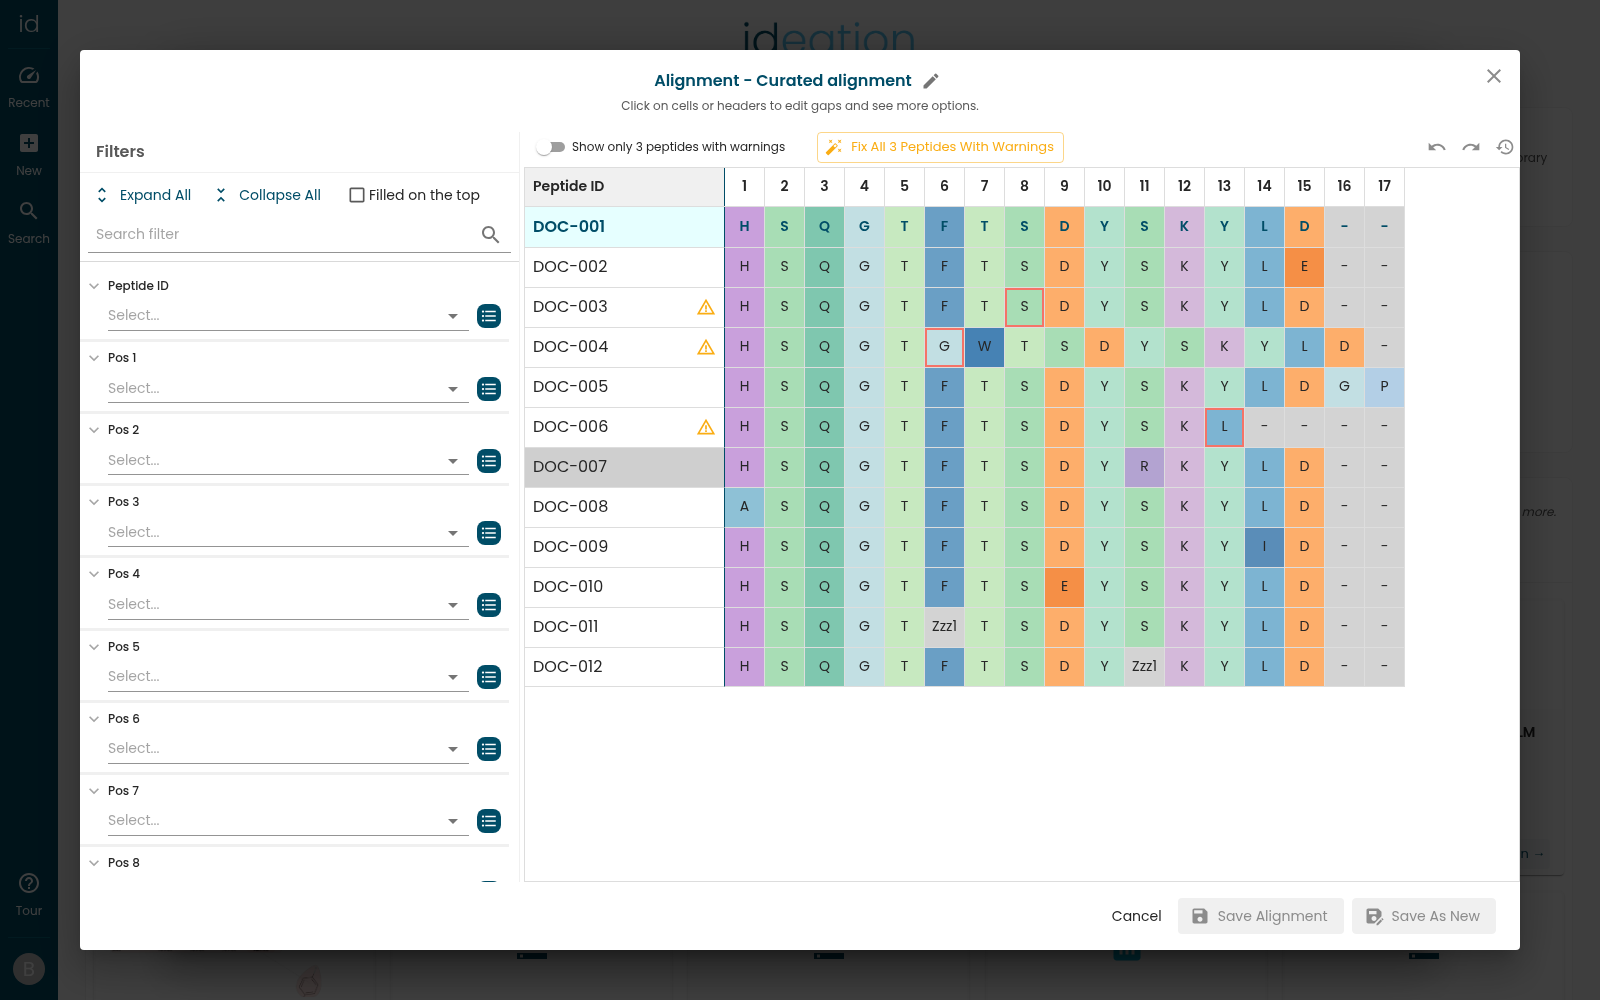
The editor makes each disagreement visible:
- Affected rows carry an amber warning icon ("This alignment differs from the dataset sequence").
- The offending cells are outlined in red.
- The toolbar offers a Show only N peptides with warnings switch to hide everything else.
Repair everything at once
Click Fix All N Peptides With Warnings. Ideation applies every repair needed to make the shown rows match their dataset sequences: wrong monomers are replaced, surplus ones removed, and absent ones inserted. It reports what it did — "Fixed N rows. Save alignment to persist." — and the repairs are yours to review before you commit them.
Fix All only touches the rows currently on display. Filter the table first if you want to repair a subset, and the button's count follows your filter.
Repair one cell at a time
Click (or right-click) any cell to open its menu. Repair entries appear only when they apply to that cell:
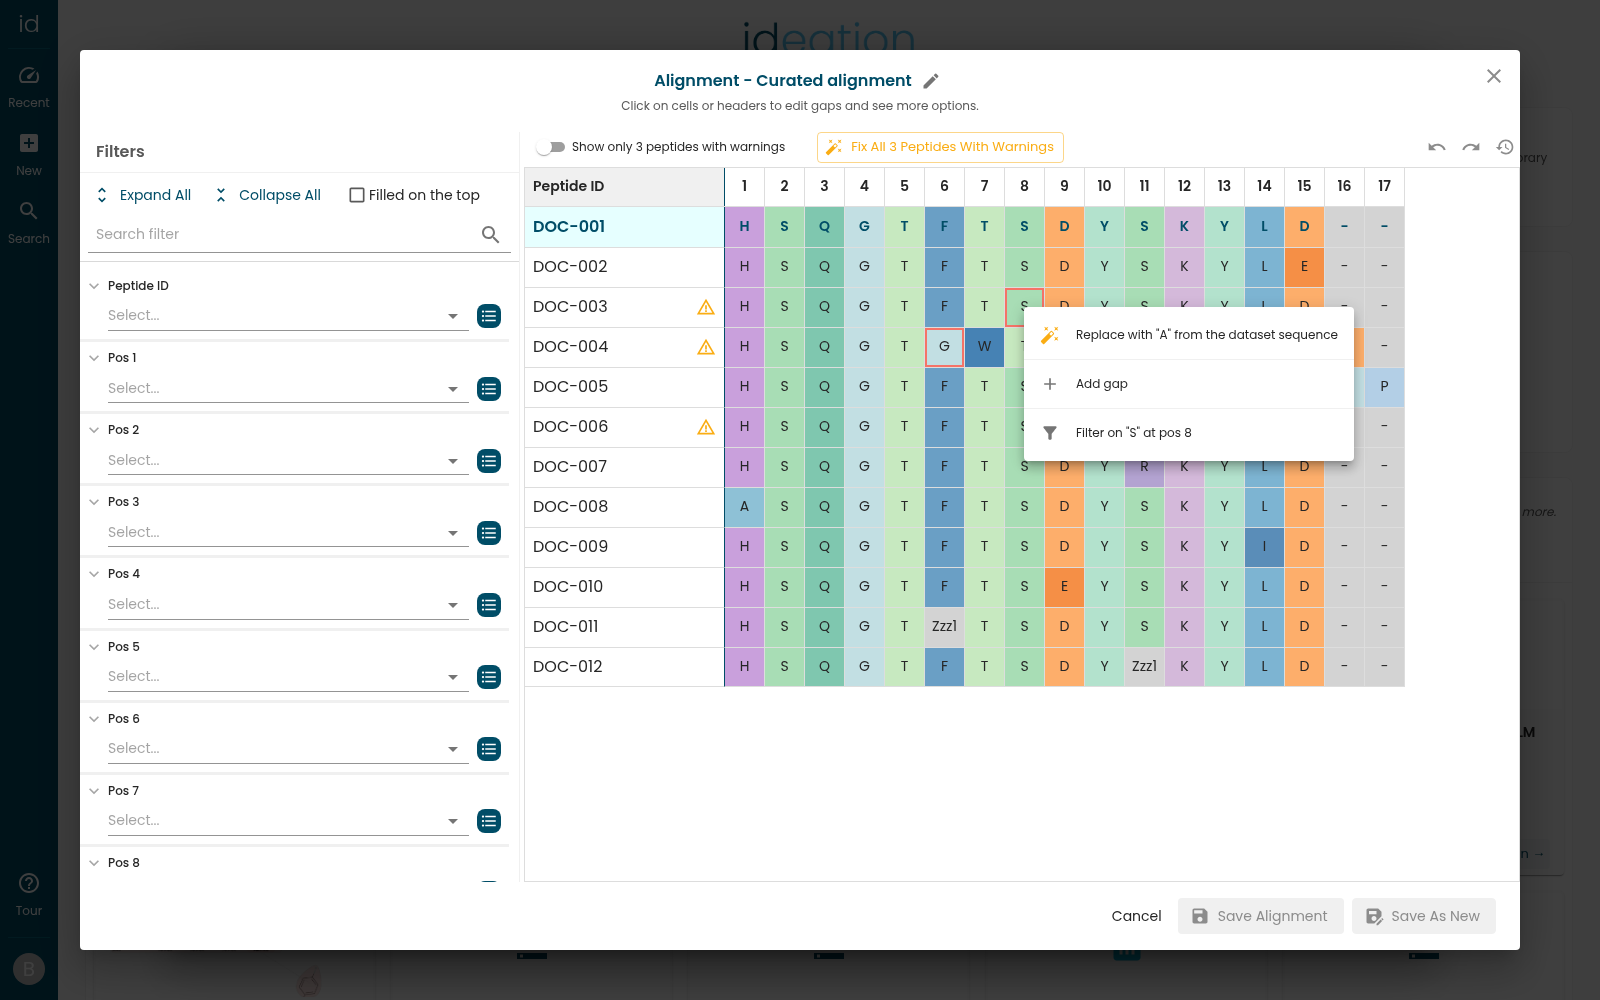
| Menu entry | When it appears |
|---|---|
| Replace with "X" from the dataset sequence | The cell holds the wrong monomer. |
| Delete this monomer | The monomer isn't in the peptide's dataset sequence at all. |
| Add "X" monomer before | A dataset monomer is absent from the alignment at this point. |
| Add "X" monomer at the end | A dataset monomer belongs past the last position. |
| Add gap / Remove gap | Always / on a gap cell — for shifting monomers without changing them. |
| Filter on "X" at pos N | Always — narrows the table to peptides carrying that monomer there. |
Read the branch markers
Two red markers tell you where a side chain joins the backbone, one on each side of the bond:
| Marker | Where | Means |
|---|---|---|
| B1, B2, … in the top-right corner | On the backbone row, on the residue the branch hangs off | "Branch 1 attached here" — this residue carries the branch. |
| * in a top corner | On a branch row, on the residue that carries the bond | "Branch 1 attaches to the backbone here" — this is the branch's own bond. |
The asterisk's corner tells you which end of the chain is bonded: top-left when the branch joins through its first residue, top-right when it joins through its last. Leading gaps do not count — a branch padded with a gap still marks its first real residue on the left. Both markers, and the bridge and chemical-object indicators alongside them, follow your gap edits as you make them.
Correct which branch a side chain belongs to
Ideation groups side chains into branches by where they attach and what they look like, and that grouping is a guess: two peptides whose side chains you consider the same series can land in different branches, and one branch can hold chains you would rather separate. You correct that here rather than by re-importing.
Click (or right-click) the backbone cell a branch hangs off — the cell marked with the branch badge — and the menu offers Reassign branch. (When a cell carries more than one branch, each gets its own entry, named after it: Reassign Branch 2.) Expanding it lists where the side chain can go:
| Target | What it does |
|---|---|
| Move to Branch N | Puts this peptide's side chain in that branch, so it aligns with its members. |
| New branch | Splits this side chain off into a branch of its own. |
Only moves that change something are listed, so the action never appears to do nothing: a branch the peptide already carries is not offered (its side chain is already there), and New branch appears only when the branch being left has other members — moving its last member would simply rename the branch. A branch with no move left to offer shows no entry at all.
The change is local until you save, like every other edit in the editor.
Clicking a position header instead gives you column-wide actions: Add gap for all peptides, Remove all gaps at this position, sorting, Remove filter, and Set as first position.
Every change is local until you save, and the red outlines disappear as soon as a cell agrees with the dataset. Use Undo (Ctrl+Z), Redo (Ctrl+Y) and Revert all changes freely.
Save
- Save alignment overwrites the alignment you opened.
- Save as new keeps the original and stores your edits under a new name (pre-filled as "«name» - copy").
When you save, Ideation re-checks the sequences and drops the sequence-mismatch warning once every peptide agrees — that is how the amber icon clears. The other warnings describe the file you imported rather than the sequences, so they stay on the alignment. Re-checking also happens on Save as new, so copying an alignment cannot be used to shed a warning it still deserves.
You can save an alignment with mismatches still in it. Nothing forces you to repair them — the warning simply stays visible so the next person knows.
Next steps
- Understanding Peptide Alignment — the method behind the computed alignments
- How to Create a Peptide SAR Report
- How to Explore the Peptide Viewer
- Understanding Peptides in Ideation